Itubes Library Format 2
A few days ago I wrote some things about the iTunes library file format. Today I will try to write the remainder about this subject.
A small recap
In the previous post I discussed the structure of the encrypted file and there should also be enough information for a mediocre programmer to decrypt a .itl file by yourself. In this post I will be using a decrypted .itl file.
The base structure
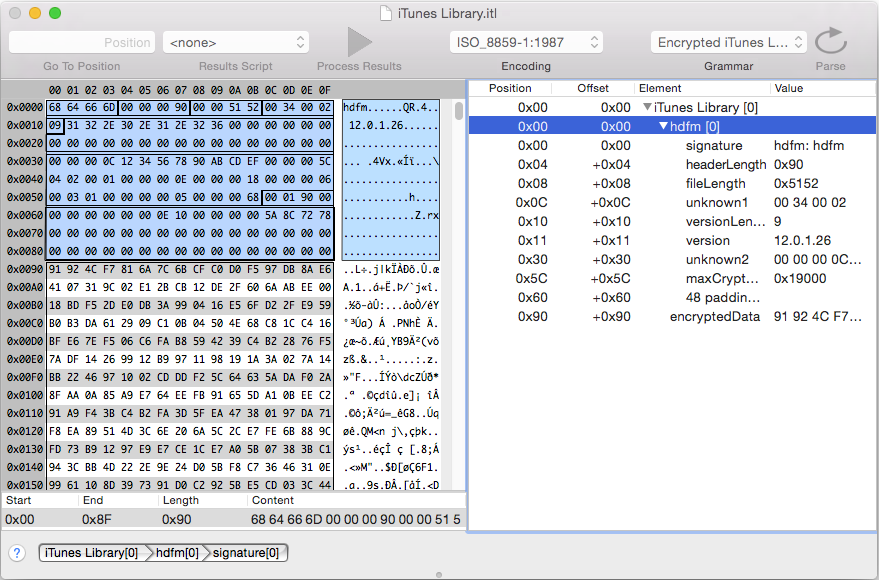
Every .itl file starts with an hdfm information header. The approximate format of this header block is documented the older file format from iTunes v1.x - v3.x. Basically after this everything is the same as in the older file format, except the header ‘names’. The hdsm now is reversed to msdh. The whole file is basically build of msdh blocks with variable sizes.
Here is a small screenshot that shows the header and the msdh blocks:
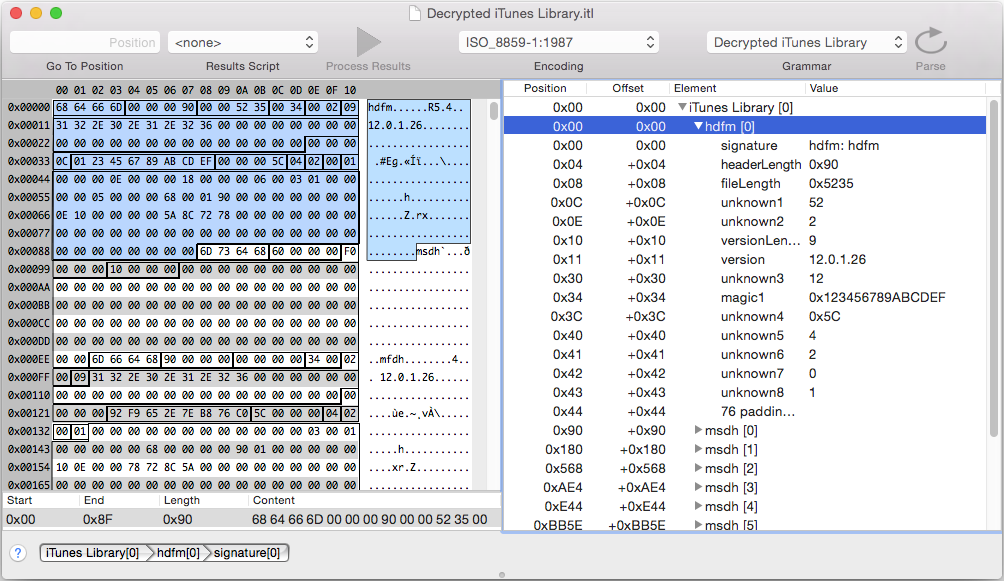
Structure of the ‘msdh’ blocks
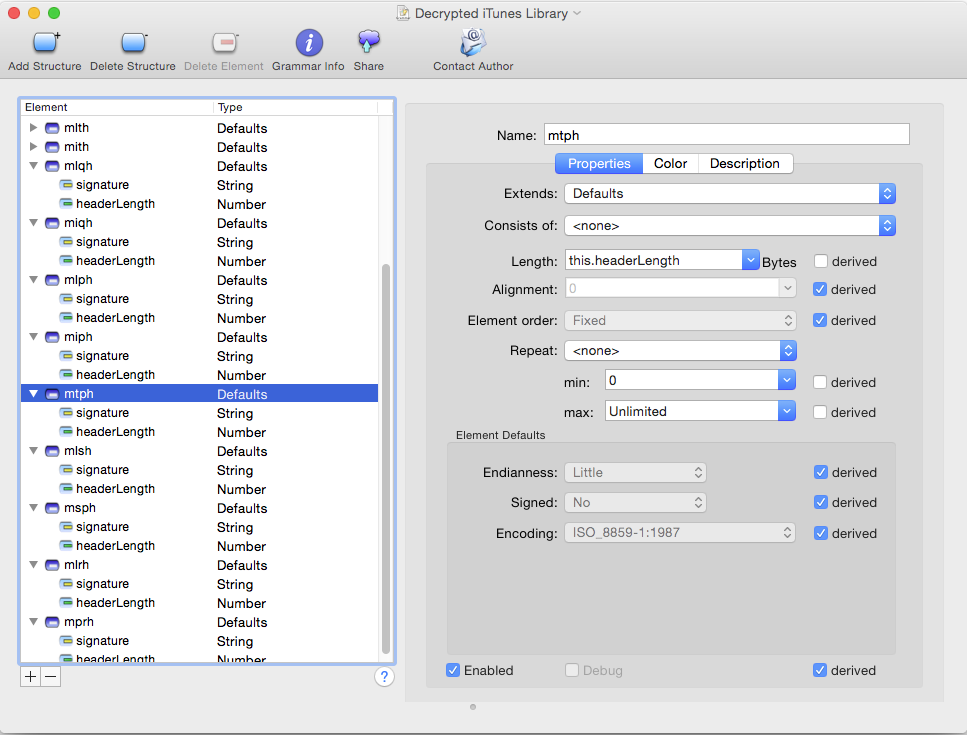
The msdh blocks contain the headerLength, totalLength and blockType as most important fields. After the msdh header, there is blockData that can contain various other types of structures. These structures very often look similar to this C-style structure:
typedef struct
{
    char signature[4]; //"mlrh" as signature identification.
    int headerLength; //total length of the header.
    char unknown[headerLength - 8]; //structure-specific data.
} mlrh;
A screenshot of how such a grammar looks:
Content of the ‘msdh’ blocks
The blockType field of the msdh block says something about the contents of the block. The value 4 for example has blockData that contains a path to the music library, /Users/xxxxxx/Music/iTunes/iTunes%20Media in my case. blockData can also contain other blocks. The miah and mith blocks for example both contain mhoh blocks. mhoh blocks are some kind of general-purpose block that can contain a lot of things.
Conclusion
The basic file format was all I needed to continue fixing requiem, so this it all for now. Maybe I will blog more about my progress later. You can find the grammar here, feel free to expand on it and don’t forget to send me the latest version if you do ;)
Merry Christmas,
mrexodia
X64_dbg From Top To Bottom 1
Hello everyone,
Quite some time ago I started thinking about ways to engage more developers in x64dbg. The main problem new developers (in my view of things) have is that x64dbg is poorly documented. Code documentation is very important in software development but when I started with x64dbg the whole concept of software development was new to me, so I did not document my code. Recently I started documenting the code of x64dbg, but code documentation is very boring, so I decided to spice it up a little (for myself mainly) with a few blog posts.
Before reading
Before you start reading this post, I recommend you read up on Creating a Basic Debugger and you should know a little about threads. You should also know where to find x64dbg’s source code in case you want to see more of the code.
The debug loop
Technically the debug loop is part of TitanEngine, not of x64dbg. The design of the debug loop, however is very important for x64dbg in general, so I will explain it here anyway.
A basic debug loop looks like this:
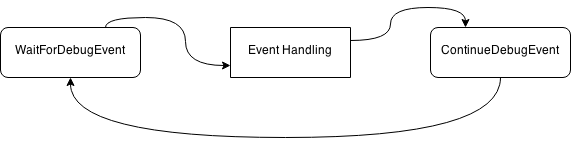
This is also how TitanEngine’s debug loop works. It handles events by calling so-called “Custom Handlers”, which you can register by calling the SetCustomHandler() function. In addition to calling custom handlers TitanEngine does a lot of housekeeping (like storing information about the threads, modules and breakpoints). It also handles certain exceptions like STATUS_SINGLE_STEP for stepping and STATUS_BREAKPOINT for software breakpoints.
The most important point of these custom handlers is the fact that they are part of the debug loop, which means the debug loop won’t continue until the custom handler returns.
Threading of the debug loop
Because the DebugLoop() function of TitanEngine does not return until debugging is finished (debuggee termination), it has to be run on a new thread, so we can continue using the GUI while debugging (which is the whole point of the GUI anyway).
Here is a little image for the overview:
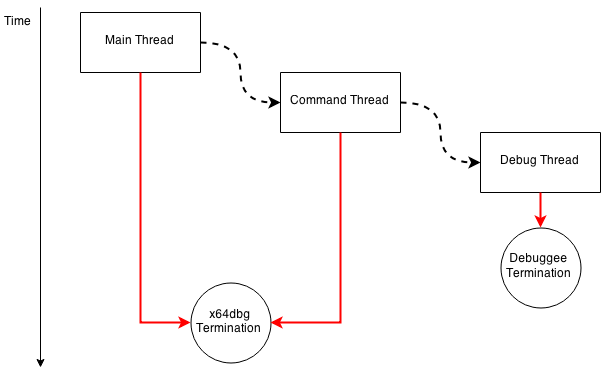
- A block represent a thread;
- A dashed arrow represents starting a new thread;
- A red arrow represents thread termination;
- A circle contains the termination condition.
The Main Thread starts the Command Thread. The Command Thread has an architecture similar to the debug loop; it waits for a command, calls a command handler and then starts waiting again.
When an InitDebug command is encountered (see help), information is obtained about the executable to debug and a Debug Thread is started. This Debug Thread contains the debug loop we discussed above.
Syncing the threads
The Debug Thread has to wait in custom handlers until the user tells it to continue (by pressing the run button in the GUI). This is done by a very simple locking system that has three main functions: lock(), unlock() and wait(). The wait() function simply waits while the lock is locked and it works across threads, so when the Debug Thread is waiting and the Command Thread calls unlock(), the Debug Thread will continue execution. You can find all this code here.
To provide thread-safe access to certain global variables (like breakpoint/comment/bookmark lists), x64dbg uses a class called CriticalSectionLocker. This class can be found in the same file as locking system above.
Conclusion
That’s all for now, I hope you enjoyed reading this and I will continue to cover various aspects of x64dbg, from the bigger picture, to small interesting details.
mrexodia
Itunes Library Format 1
Hello everyone,
More than a month ago I posted about some code I had to write for a project, today it will be about exploring the iTunes Library file format.
Background
“Why reverse the iTunes Library format?” you might ask, well it all started with a university project. Basically we’re developing an app for Android/iOS using Xamarin and since Apple doesn’t like Windows, it is impossible to create/compile/test iOS apps without having access to Mac OS X. I installed a hackintosh distribution to start developing the app.
One time, when I was browsing iTunes I saw I had 15 euros left on my account, so I decided to buy an eBook I saw on TV. But Apple still hates Windows/Android/Whatever and after I spent my money I discovered it was impossible to read books bought in the iBooks store on a non-iDevice. I tried searching for some DRM removal tools, but there was only one and it didn’t work (it’s called requiem by the way).
Since I like reversing I decided to take on FairPlay (Apple’s DRM) in order to unlock the .epub file so I can read it on my Sony eReader.
In the process of checking out the old sources I discovered that the iTunes Library was read and decrypted, but after that the file format did not match the code anymore. Since the code was made for iTunes v10.x, not v12.x I had to figure out the new library file format.
The past
In the past people tried to reverse the iTunes Library file format, the more notable document is this one. It’s for iTunes v1.x - v3.x, but it was still useful for me now. Another resource is the previously mentioned requiem source code.
Getting started
Before we get started I’d like to introduce a very good tool called Synalyze It! Pro. Basically it’s a hex editor, but it’s main feature (for us at least) is the ‘Grammars’ option. Grammers are XML files that describe data structures and when a structure matches with a file, you can see the structure contents and highlight/manipulate the bytes they are mapped to. Reading the documentation is recommended before you continue.
It might also be useful to note I’m doing everything on Mac OS X (probably iTunes for Windows has the same format, but I didn’t check).
Now copy the iTunes Library file called iTunes Library.itl from ~/Music/iTunes/ to your documents folder or something and open it up in Synalyze It to start working with it.
Encryption + ZLIB
In the requiem source code, you can see in ModifyLib.loadLibrary() that the iTunes file from v10.x used AES/ECB/NoPadding with the key BHUILuilfghuila3:
...

// decrypt all full blocks in the body
Key key = new SecretKeySpec("BHUILuilfghuila3".getBytes(), "AES");
Cipher cipher = Cipher.getInstance("AES/ECB/NoPadding");
cipher.init(Cipher.DECRYPT_MODE, key);
int crypt_size = (data.length - header_size) & ~0xf;
int max_crypt_size = read32(data, 0x5C);
if (max_crypt_size != 0)
    crypt_size = Math.min(crypt_size, max_crypt_size);
cipher.doFinal(data, header_size, crypt_size, data, header_size);

// un-zip body (ZLIB)
Inflater inflater = new Inflater();
inflater.setInput(data, header_size, data.length - header_size);
byte[] clear_data = new byte[65536];
while (!inflater.finished())
{
    int n = inflater.inflate(clear_data);
    o.write(clear_data, 0, n);
}

...
After reading the older file format from iTunes v1.x - v3.x and the requiem source it is quite easy to create a Grammar for the encrypted file format:
Conclusion (for now)
Hopefully this was an interesting start. Unfortunately I don’t have enough time to post the full story, but there will be a next post soon (I hope). In the meantime, try modifying the requiem source to output a decrypted iTunes library of your own. This will be required for the next post. Another thing you might want to do it setting up Eclipse with the Makefile included in the requiem source. This will make dumping the decrypted library a lot easier.
Till next time,
mrexodia
Undolist
It’s been two months, but I finally found some time to post something in this blog :)
Background
As a programming exercise for the University we have to create a simple Paint-like program in C#. It has some tools (lines, rectangles, ellipses, text), it must be able to save/load to a custom format that represents the current drawing and it must be able to export to common image formats.
As representation of the current sketch I use a List<T> structure. The objects that were last added to the list are draw ‘above’ objects added previously. A bonus task was to add an Undo/Redo functionality, which I will explain in this post.
Objectives
What I wanted to create was a transparent data structure that could just replace the existing List<T> structure, without having to add additional statements to keep the Undo/Redo state. Furthermore the structure should be usable in a wide variety of cases.
What I did (summary)
First I created a class that represents the List<T> functionality called UndoList<T>. This class has a private class called UndoAction<U>, which represents something that happened to the original list. The UndoList<T> class has a List<UndoAction<T>> member that represents the stack of changes. To be able to provide a Redo functionality, there is a pointer member that points to the last change (I will come to this later).
UndoAction
This class is very simple. It contains the action performed (ActionType) and the actual object that was Added/Removed:
private class UndoAction<U>
{
    public ActionType Type { get; private set; }
    public U Value { get; private set; }

    public UndoAction(ActionType type, U value)
    {
        this.Type = type;
        this.Value = value;
    }
}
UndoList
This class has to be able to do the simple list operations: list[i], list.Add(), list.RemoveAt() and List.Clear(). These functionalities are very easy to implement:
public void Add(T value)
{
    list.Add(value); //add the value to the actual list
    addUndoAction(new UndoAction<T>(ActionType.Add, value)); //add an entry to the Undo list
}

public void RemoveAt(int index)
{
    addUndoAction(new UndoAction<T>(ActionType.Remove, list[index]));
    list.RemoveAt(index);
}

public void Clear()
{
    foreach (T value in list)
        addUndoAction(new UndoAction<T>(ActionType.Remove, value));
    list.Clear();
}

public T this[int index]
{
    get
    {
        return list[index];
    }
    set
    {
        list[index] = value;
    }
}
To provide the functionality of the foreach loop, UndoList<T> needs to be a subclass of System.Collections.IEnumerable. Implementing this interface is really easy for us: we simply return the Enumerator of the actual List<T> member which contains the representation of the sketch.
Implementing the IEnumerable interface goes like this:
public class UndoList<T> : IEnumerable
{
    private List<T> list; //the actual list with data

    public IEnumerator GetEnumerator()
    {
        return list.GetEnumerator();
    }

    //other members
}
The pointer member
If we were only required to provide an Undo functionality, we could just use a list with UndoAction<U> entries. When the Undo() function is called, undo the action and remove the last entry of the list. For Redo() to work, we either need to keep track of the Undo’s we did (which comes down to keeping track of a list that is used to keep track of another list) or we need to use a pointer. The pointer member of the UndoList<T> class points to the last action that was added to the List<UndoAction<T>> list. When Undo() is called, the action will be undone and after that the pointer is decreased. We can do this until the pointer equals -1, which means there is no action left to undo. After you called Undo() a few times and you then call Redo(), the pointer will be increased and after that, the action will be applied to the list with data (see Undo() and Redo() functions for code).
Final words
This class is a good example of how templates can be used in a meaningful way and I learned quite some things from it. I made the source available under the MIT License, you can get it here.
This class has very minimal functionality of the List<T> class. Sorting has no Undo/Redo and Clear() makes it look like every element was removed one-by-one. Feel free to improve on this :)
mrexodia
Utf8
Quite some time since I last wrote something. I recently started attending a University, so that took all of my time past weeks :)
Anyway, during a very easy lecture about programming I decided to actually program something myself, which turned out to be Unicode support for x64dbg!
Theory
At first I thought I would have to rewrite the command parser and whatnot, but that turned out to be not needed at all…
At first I wanted to convert every char pointer and constant to the Windows-supported wchar_t type, but this would take far too long to execute + it would break plugin compatibility and the complete internal API, which just sucks. Various discussions and a blogpost later I decided to use UTF-8 internally and call WinAPI with conversion functions.
Basically it required three things:
1) A C++ class like QString that allows string operations on UTF-8 string;
2) Conversion functions from UTF-8 to UTF-16 and the other way around;
3) ‘Converting’ all external ASCII calls to their UNICODE variant (WinAPI, TitanEngine, dbghelp, etc).
Practice
The first step was quite easy, I grabbed this GPLv3 UTF::String class and changed it to my needs. This became the UString class.
The second step was also very easy, the blogpost I mentioned earlier had two ready-to-use functions called ConvertFromUtf16ToUtf8 and ConvertFromUtf8ToUtf16. Those worked great, except that they would crash when fed with null as argument. Wrapping them in UString solved that issue without having to think :)
The third step seemed easy at first, I could debug a random application with a Chinese path within minutes. After that however, came a small moment of confusion, because Qt appears to be interpreting const char* strings as Latin1 per default. The following code solved this and after that the log etc. were working correctly:
// Set QString codec to UTF-8
QTextCodec::setCodecForLocale(QTextCodec::codecForName("UTF-8"));
QTextCodec::setCodecForCStrings(QTextCodec::codecForName("UTF-8"));
QTextCodec::setCodecForTr(QTextCodec::codecForName("UTF-8"));
Now all that is left is the tedious task of snooping through the code looking for incompatible GetModuleFileNameExA functions calls and convert them.
Concerns
The main concern will be that plugins will need to support UTF-8 and that new developers for x64dbg will have to adapt their coding a little. For plugin coders there will be conversion functions in the Bridge, but the conversion functions from the blogpost are really easy to copy-paste.
Conclusion
In overall adding UTF-8 support turned out to be quite easy and the work involved is just tedious, not really hard or very annoying. It can be done in little free time by almost anyone, so feel free to submit pull-requests :)