Ollydbg
Today I wrote an answer on Quora about how OllyDbg was written. I thought it was interesting so I decided to cross-post it here as a blog entry:
Writing a tool like OllyDbg is not a trivial task. OllyDbg is in essence a debugger with code analysis features, however it has a big range of relatively small extra features that make it a nice thing to use. As of my qualifications, I’m the main developer of x64dbg, which is heavily influenced by OllyDbg and offers similar features but on the 64-bit platform.
The debugger part starts out quite simply. Check out Creating a Basic Debugger for a simple example of what a debugger looks like. In essence you start a process (debuggee) with a special flag so it sends information (debug events) to the debugger. The debugger then processes these events and shows information about the process to the user. Certain events (mainly single-step and breakpoint exceptions) are used to control the execution of the debuggee. If you are interested in a little more detail, check out GleeBug. It is a debug library that will be used in x64dbg soon.
The code analysis is a far more difficult problem to solve. The ‘easy’ part involves giving information about instructions pointing to memory/exported symbols and providing nice syntax highlighting. An all-white deadlisting of instructions is not very friendly to read and OllyDbg does various things to ease the experience. The hard part is actually doing control flow analysis (detecting functions and loops for instance). If you’re interested I wrote up the details of a very naive algorithm here. Some more involved algorithms are available here (by me) and here (by Nukem). Analysis is really, really hard to get working right. There are lots of corner cases and obfuscated binaries that ‘fool’ your analysis and things get especially fuzzy when control flow branches inside of other instructions or otherwise breaks the linear disassembly.
Even if you have a really good debugger and code analyser, you are still far from done. Once people start using your software, bug reports and feature request will come raining in and it can sometimes be soul-destroying to work on a project like this (especially with just intellectual motivation).
Everything needs to be very generic and getting things stable becomes a very complex problem very quickly. See the x64dbg bug tracker if you are interested in what kind of issues people have and report.
Another thing that makes OllyDbg great is that it’s so user-friendly. There are no complex commands involved and everything can be done from the graphical user interface. This is what I believe makes OllyDbg strong. Creating a GUI similar to the one of OllyDbg is rather complex (and boring). It involves custom painted components and a lot of menus.
Finally, OllyDbg offers a great plugin ecosystem, allowing people to extend/modify OllyDbg in lots of ways. People created hundreds of plugins, ranging from simple breakpoint managers to a total overhaul of the program. Creating a system like this is very challenging and pleasing everyone is really hard. It involves writing wrappers around internal functionality and make those available to the plugin writer. You also need to provide the plugins with an interface to hook in the debug loop and intercept debug events.
I hope this answers your question. Feel free to ask me if you need more information.
More content is coming soon to this blog, stay tuned!
Duncan
Lightshot Reversing
Hello everyone,
No surprise it has been a very long time since I last wrote something here, I guess I don’t have enough time or will to keep up with this blog. However, today I did something simple that I would like to share with you guys.
We all know screenshot tools like Lightshot, PokIt or ShareX. This blogpost will be about Lightshot in particular but these are just some alternatives to use.
I like Lightshot very much, it has a very simple interface with a text editor, some arrows and boxes and it is great for quick screencapping. However it has one downside: the uploader. The uploader uploads your image and then returns an URL in the prntscr.com subdomain. This wouldn’t be much of a problem, if the page wasn’t ad infested and it is also difficult to get the direct link to the image (for example to link to in your blog).
Today I was bored so I decided to take a look at how their API works so we can change this behavior to show a direct link.
For tools I’ll be using Fiddler4 and XAMPP (basically Apache, but XAMPP is just a nice wrapper around it for simplicity).
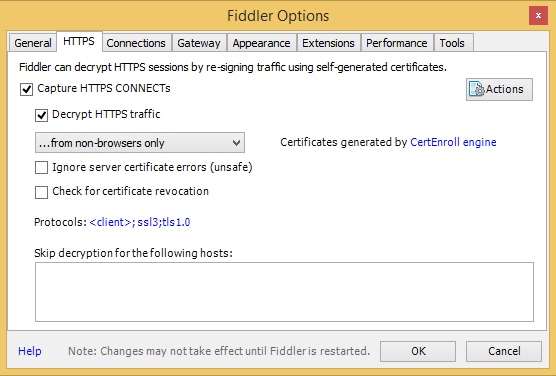
After you started Fiddler4, go in options and enable decryption of HTTPS traffic for non-browsers. This will notify you to install a new certificate in the root. This certificate is used for the man in the middle proxy so HTTPS traffic can be decrypted.
Now simply capture something on your screen and hit the upload button in Lightshot. Fiddler should capture the traffic and you can stop the capture (F12).
The result looked something like this for me:
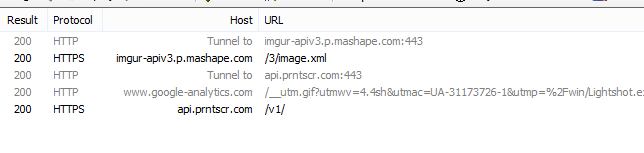
You can check out all the details of the traffic in the various tabs, but to summarize:
- Lightshot uploads the image to imgur using the imgur API
imgur-apiv3.p.mashape.com; - It sends some data to Google Analytics (not very interesting for us);
- It sends a request to their own API
api.prntscr.com.
Checking the request headers to their own API they look something like this (if you’re logged in it will also contain a token for authorization, which I ommited for obvious reasons):
POST https://api.prntscr.com/v1/ HTTP/1.1
Accept: */*
Content-Type: application/x-www-form-urlencoded
Host: api.prntscr.com
Content-Length: 261
Cache-Control: no-cache

{"jsonrpc":"2.0","method":"save","id":1,"params":{"img_url":"http:\/\/i.imgur.com\/q2clfFY.png","thumb_url":"http:\/\/i.imgur.com\/q2clfFYs.png","delete_hash":"3VYbjevxfJ0qIJw","app_id":"{F1F88C8C-9A9B-45E2-913F-489DF108D86F}","width":450,"height":354,"dpr":1}}
The response is something like this:
HTTP/1.1 200 OK
Server: cloudflare-nginx
Date: Mon, 21 Dec 2015 17:51:55 GMT
Content-Type: application/json
Transfer-Encoding: chunked
Connection: keep-alive
Set-Cookie: __cfduid=d1a123603fd50b8f9fb5992716bd5cb0f1450720314; expires=Tue, 20-Dec-16 17:51:54 GMT; path=/; domain=.prntscr.com; HttpOnly
X-Powered-By: PHP/5.5.9-1ubuntu4.14
CF-RAY: 2585700ef8880767-AMS

7b
{"jsonrpc":"2.0","id":1,"result":{"url":"http:\/\/prntscr.com\/9gvphh","info":"Anonymously uploaded image","success":true}}
0
As you can see, they send the imgur URL to the API and the API will add the image to the database and return their own custom URL. We just want the direct link to the image, so we are going to write a very simple emulator for this API that just returns the URL it was given.
The code is very simple, you can get it from here it should be really straightforward to understand, especially with the comments. Basically it does this:
- Get the raw POST data (JSON encoded);
- Decode the JSON to an associative array;
- Construct a response associative array;
- Encode the response in JSON;
- Set the right header and echo the response text.
Their API uses chunked transfer encoding, but CURL eats a raw response just as well.
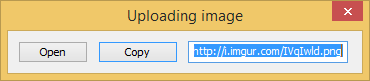
Put this line in C:\Windows\system32\drivers\etc\hosts:
127.0.0.1 api.prntscr.com
Then put index.php in a directory called v1 and start your Apache server. If everything went okay, the upload window should look like this:
That’s all for now, I hope you enjoyed this post!
Oh, quick update. This also works on the OS X version of Lightshot, however there you need to reboot in order to make the /private/etc/hosts file change work.
mrexodia
Crackme
Hello everybody,
Even though there has been almost no activity on this blog for a few months I have been very busy.
Here is a simple crackme for you guys, contact me with a keygen (and preferably a small tutorial) to get listed (with a website of choice) in this list:
Have fun!
mrexodia
123456
Sitting at a camping with a broken toe makes you bored, very bored in fact. So bored I started to look at the camping network structure.
Scanning the environment
The first thing I noticed was the cameras with a nice little antenna hanging all over the place. In an old DefCon talk I saw the security of most IP cameras was shit, so I decided to give it a shot myself.
The camera model I am currently talking about is the ELRO C903IP.2. I reversed the firmware of another ELRO camera and it had very similar directory structures and web commands, so I believe it is safe to assume all ELRO cameras are affected.
Because I had no idea of the network layout beforehand I ran a little nmap scan to get the list of online IP addresses in the local subnet:
MacBook-Air:~# nmap -sP 192.168.1.0/24

Starting Nmap 6.47 ( http://nmap.org ) at 2015-08-10 00:28 CEST
Nmap scan report for 192.168.1.1
Host is up (0.0055s latency).
Nmap scan report for 192.168.1.4
Host is up (0.00048s latency).
Nmap scan report for 192.168.1.6
Host is up (0.057s latency).
Nmap scan report for 192.168.1.7
Host is up (0.054s latency).
Nmap scan report for 192.168.1.8
Host is up (0.047s latency).
Nmap scan report for 192.168.1.11
Host is up (0.052s latency).
Nmap scan report for 192.168.1.17
Host is up (0.044s latency).
Nmap scan report for 192.168.1.24
Host is up (0.11s latency).
Nmap scan report for 192.168.1.26
Host is up (0.0028s latency).
Nmap scan report for 192.168.1.101
Host is up (0.0085s latency).
Nmap scan report for 192.168.1.102
Host is up (0.0084s latency).
Nmap scan report for 192.168.1.105
Host is up (0.021s latency).
Nmap done: 256 IP addresses (12 hosts up) scanned in 9.12 seconds
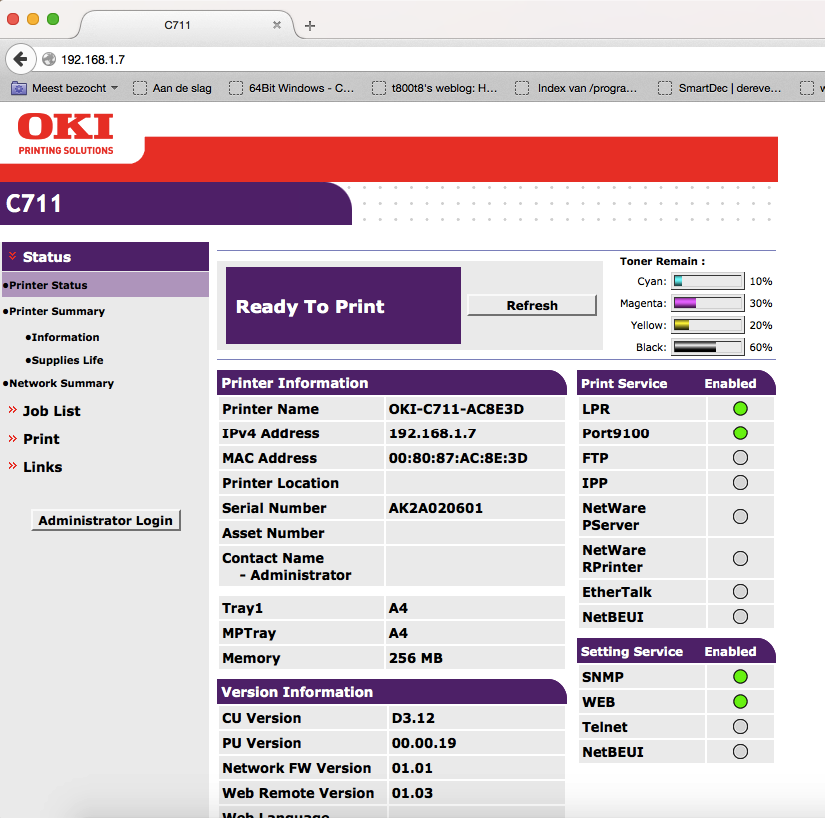
The thing that struck me was the low addresses after the gateway 192.168.1.1 so I first checked those out. Turned out the lower addresses were DHCP (my MacBook was 192.168.1.4). I did find a nice open printer though:
Web authentication gone wrong
After some more checking I found a login screen at 192.168.1.101. This could be a camera!
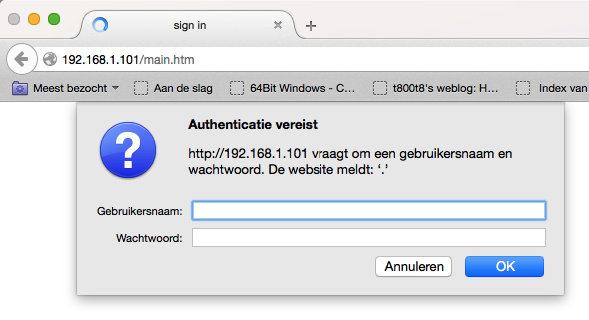
Trying some default stuff (admin:admin, admin:1234) etc. didn’t appear to work, so I just pressed the Cancel button:
Besides the lack of even a self-signed HTTPS certificate it was obvious that even the login screen had serious security issues. After the initial state of shock I decided to check out the page source code:
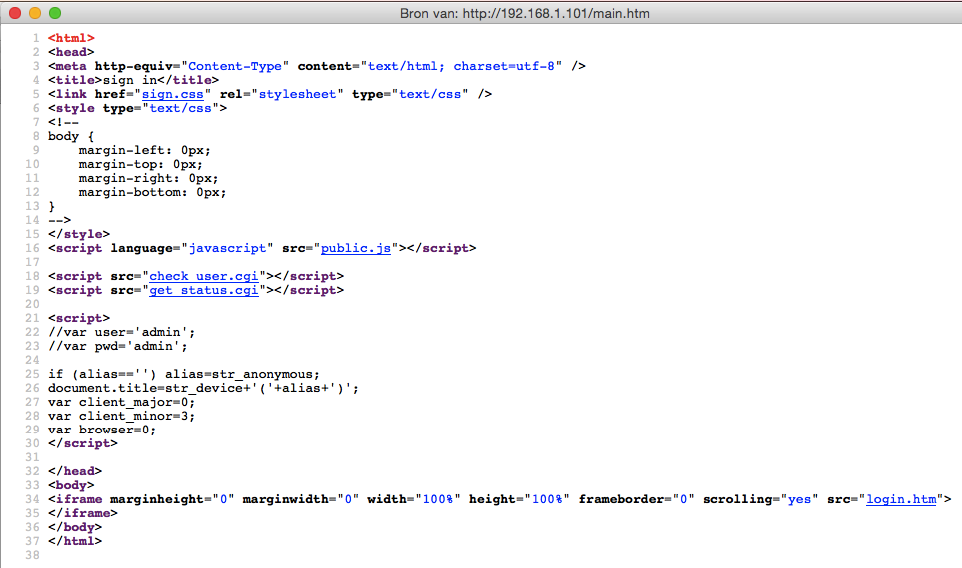
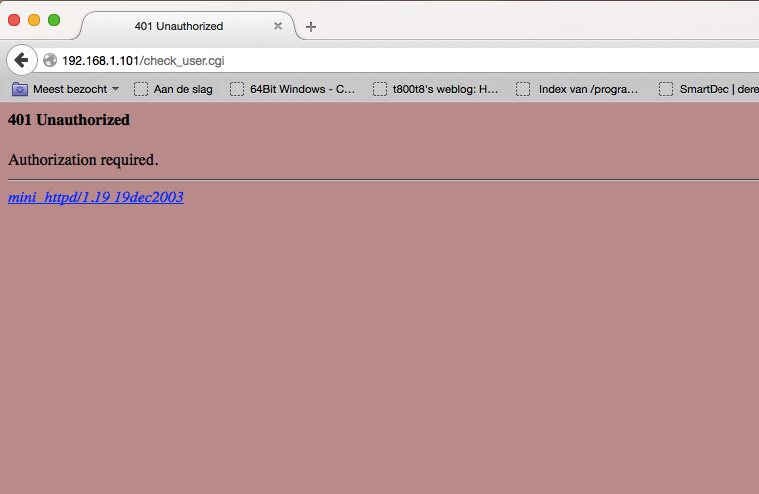
check_user.cgi appears to be the page generating the HTTP authentication (which is plain text by the way). The page only shows us 401 Unauthorized and the name and version of the web server mini_httpd/1.19 19dec2003. There are some known vulnerabilities for that version, but they had no POC code for reading files so I put that on halt for the time being.
get_status.cgi requires no authentication (wtf) and it shows some identifying information like the system version and some other status information
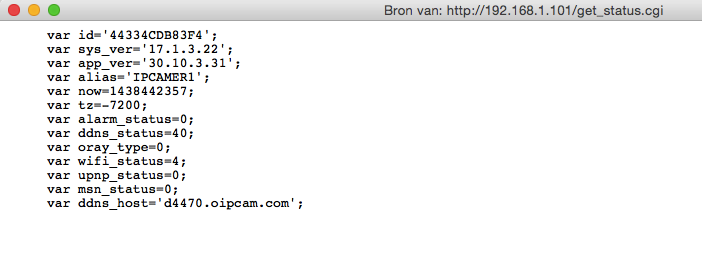
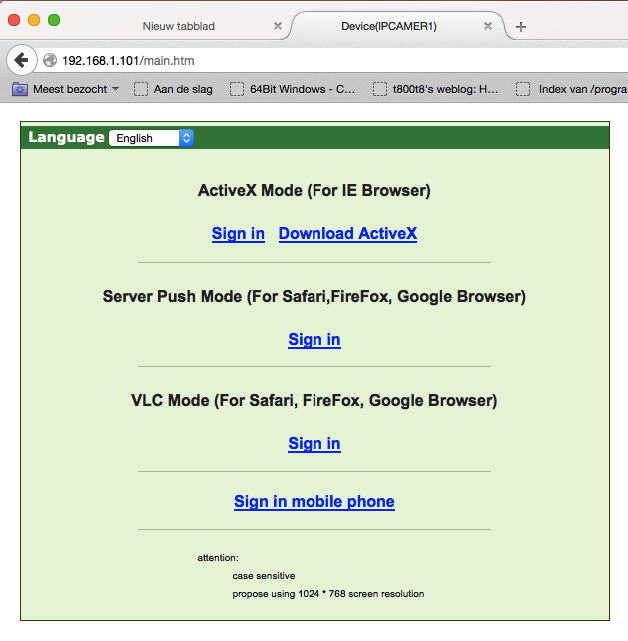
Since there were some links on the login page I decided to try and sign in to the camera web interface. Clicking the link and pressing cancel a few times showed the full web interface, but unfortunately the feed was black.

An unexpected surpise
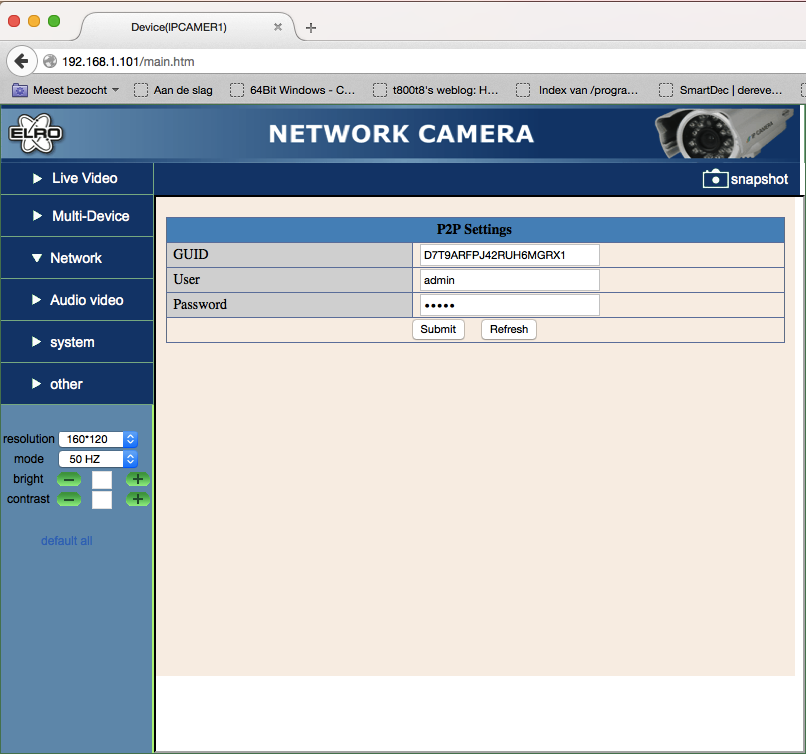
Trying to click some of the terrible popup menus on the left (I had been a few hours on the web interface at this point) gave some more device information (obtained from the get_status.cgi), but the P2P menu showed some actually interesting stuff!
The iframe led me to p2p.htm, which contained some GUID, a username and a password (you are kidding me right?) Just setting the input type to text with the inspector revealed the details in full glory:
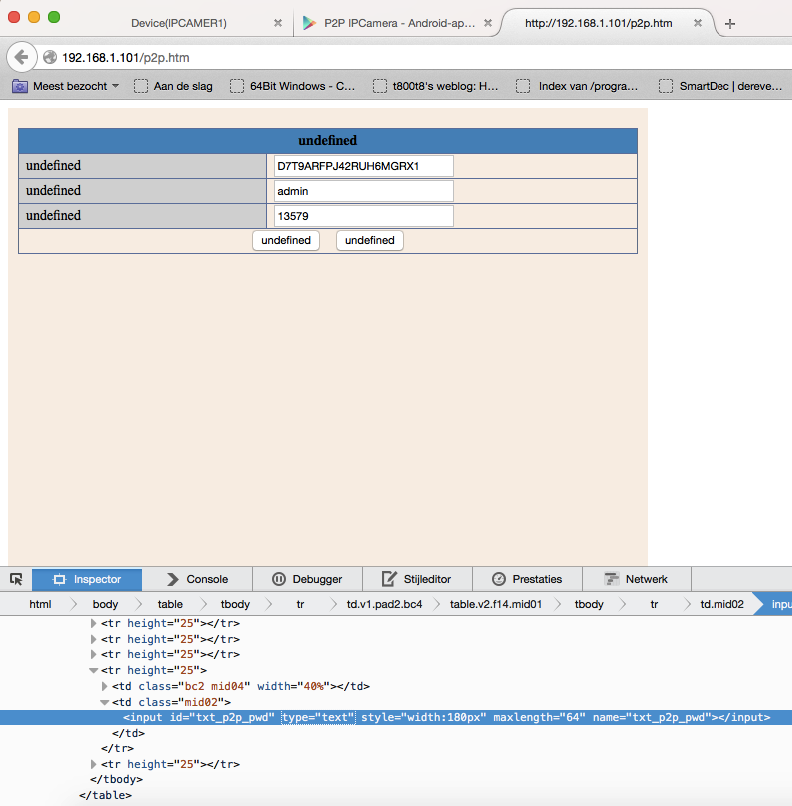
Checking the source it turns out that get_tutk_account.cgi has no .htpasswd protection which is why it shows the password in the web interface.

Theory in practice
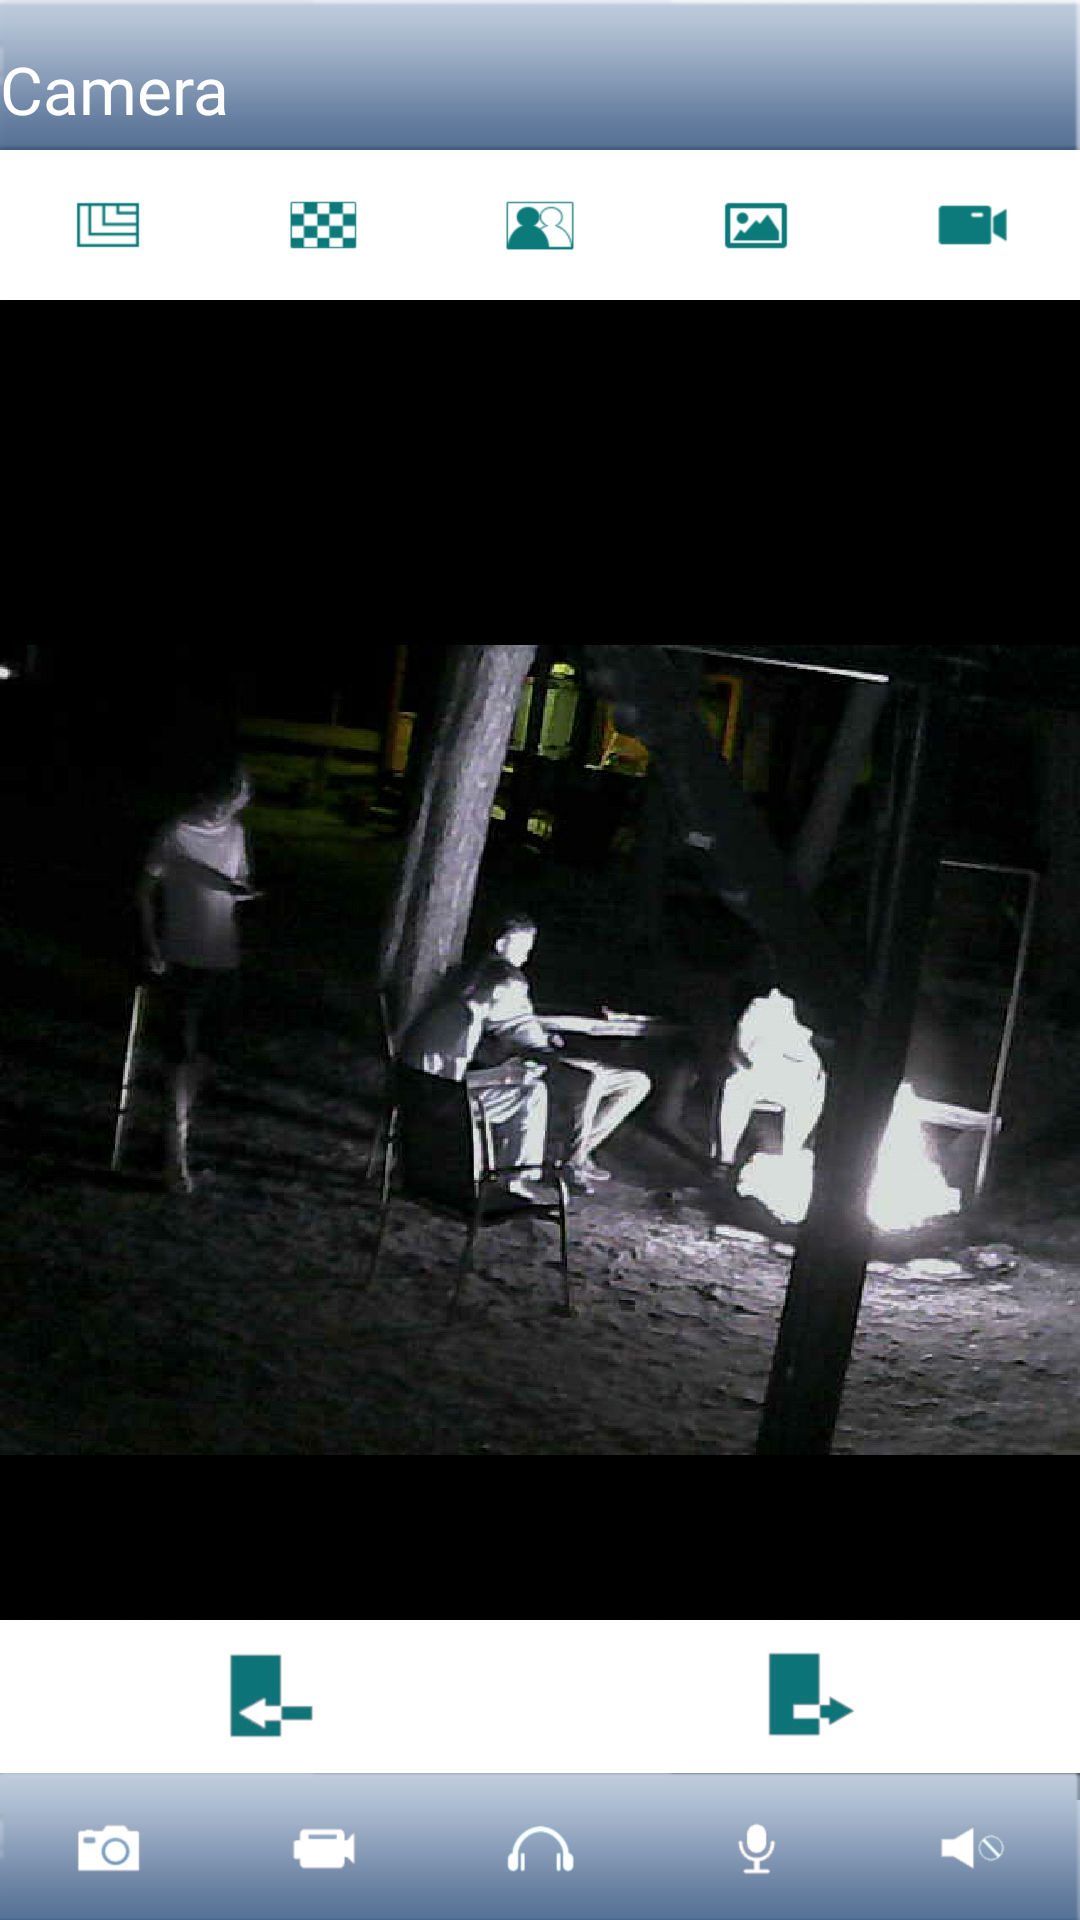
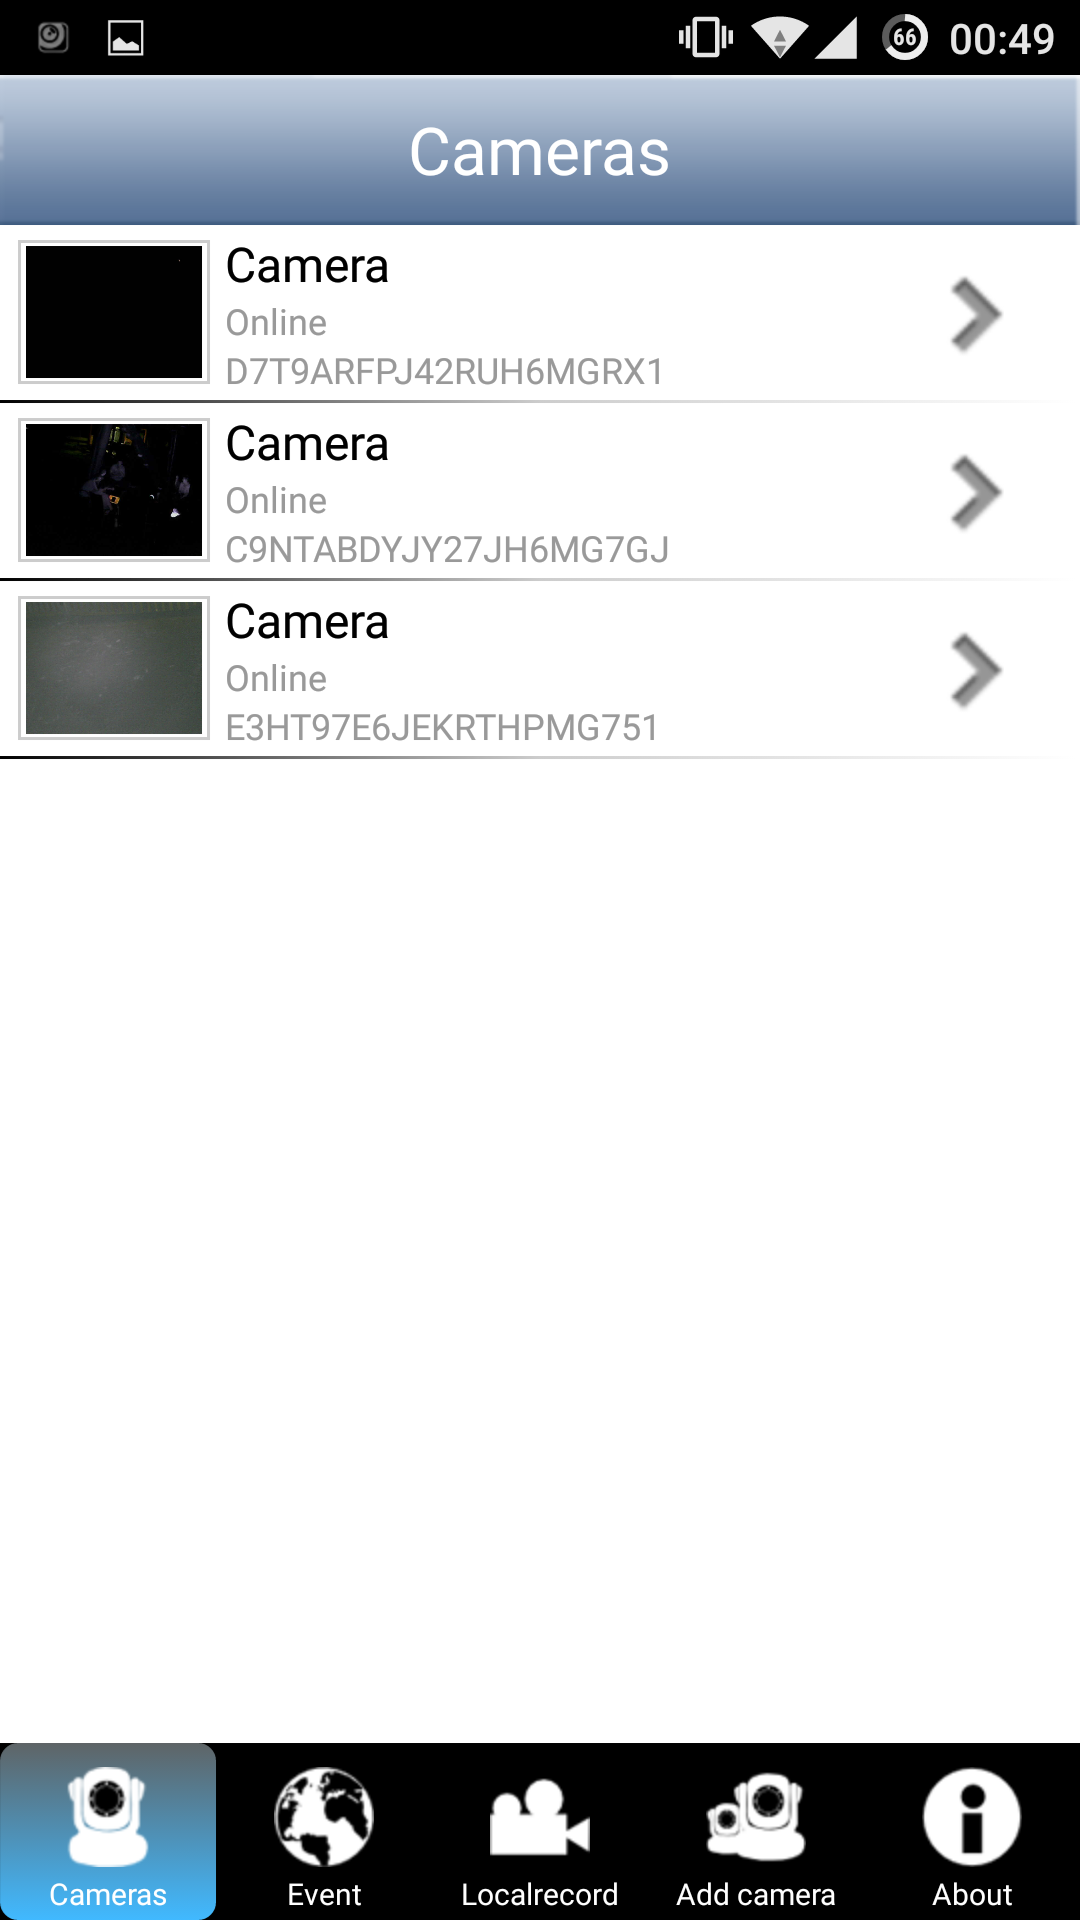
Googling for a P2P IP Camera app gives this nice app that automatically gets the running cameras:
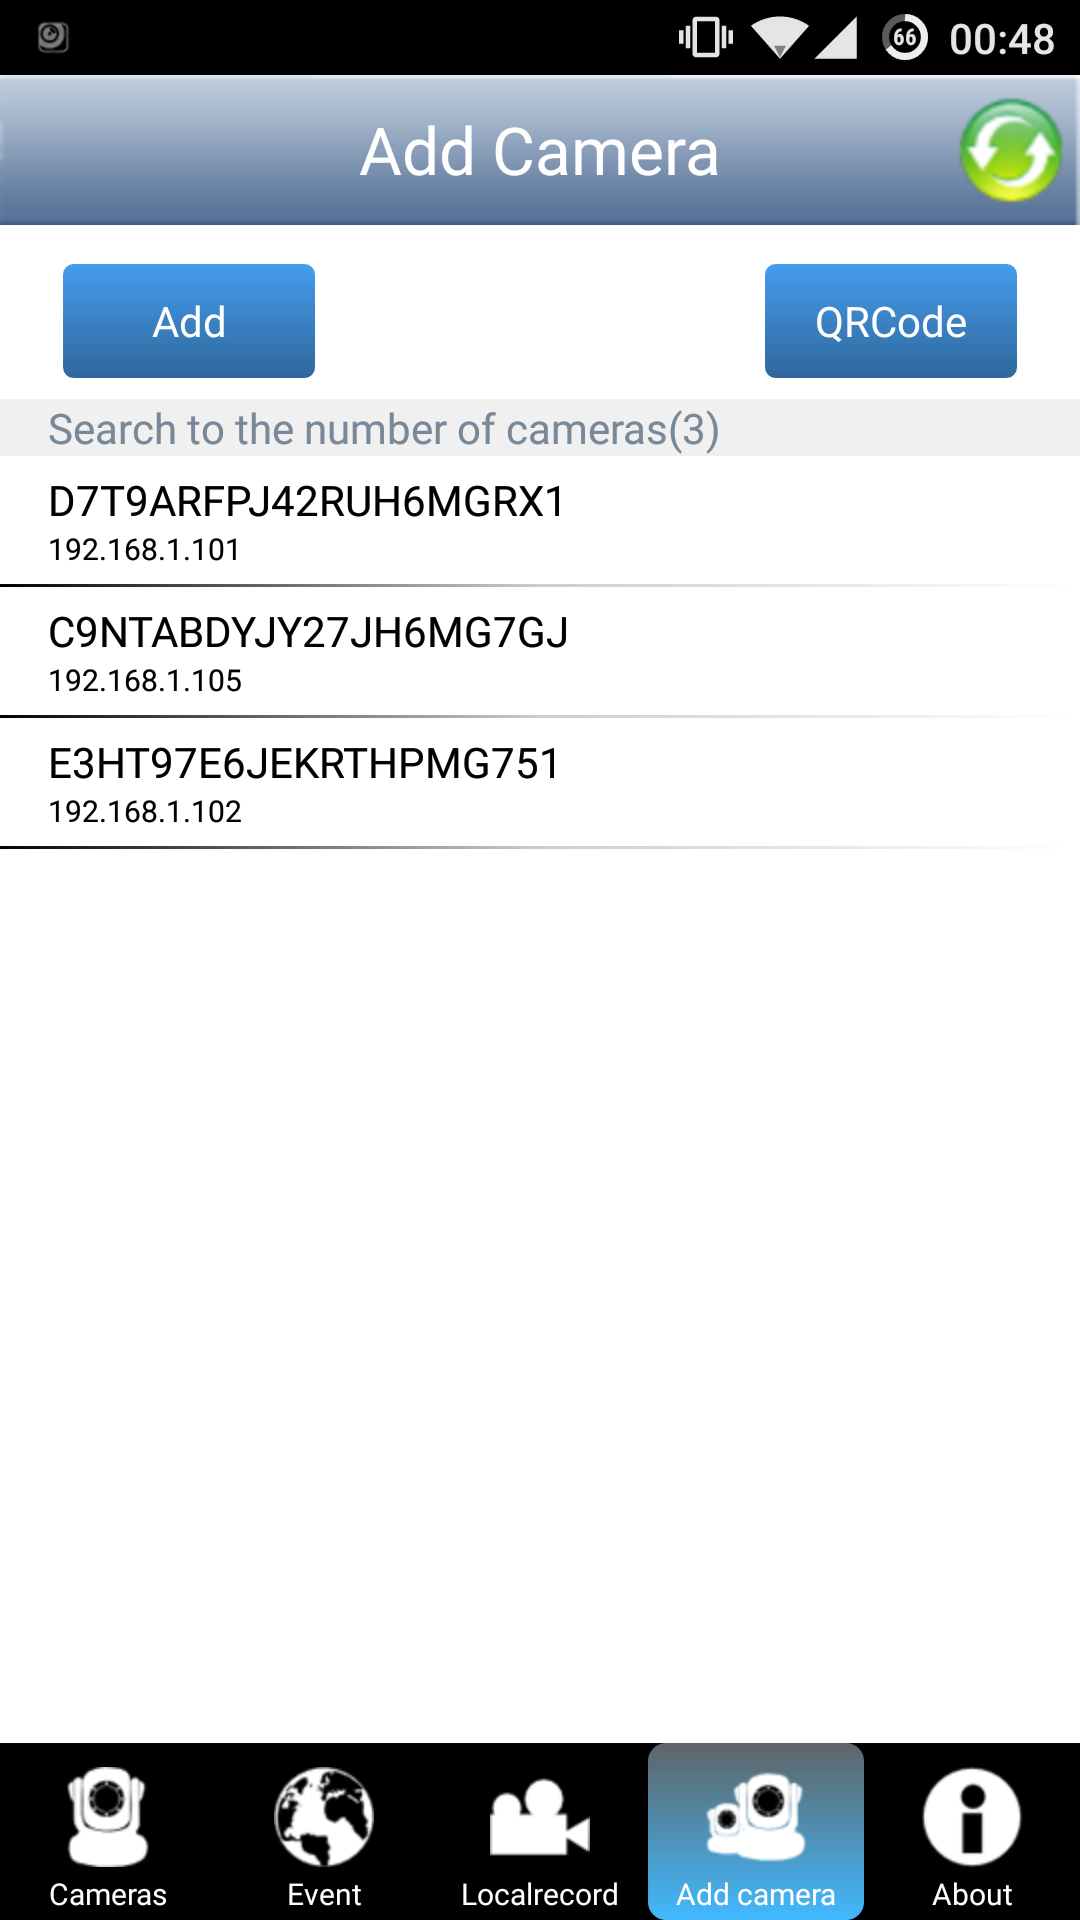
Selecting the right camera and entering the password given by the web interface shows this nice feed by the campfire (notice me walking around with crutches):
The other cameras have the same vulnerability (probably the same model):
Going for gold
After this serious issue I couldn’t get much further with the web interface (just some directory listings, but no directory traversal or anything). I did try to access .htpasswd (read something about that for old versions of mini_httpd), but it gave a graceful 403.
Let’s try another nmap scan to see what services are running on the device:
MacBook-Air:~# nmap -sV -vv 192.168.1.101

Starting Nmap 6.47 ( http://nmap.org ) at 2015-08-10 00:52 CEST
NSE: Loaded 29 scripts for scanning.
Initiating Ping Scan at 00:52
Scanning 192.168.1.101 [2 ports]
Completed Ping Scan at 00:52, 0.00s elapsed (1 total hosts)
Initiating Parallel DNS resolution of 1 host. at 00:52
Completed Parallel DNS resolution of 1 host. at 00:52, 0.02s elapsed
Initiating Connect Scan at 00:52
Scanning 192.168.1.101 [1000 ports]
Discovered open port 80/tcp on 192.168.1.101
Discovered open port 23/tcp on 192.168.1.101
Increasing send delay for 192.168.1.101 from 0 to 5 due to max_successful_tryno increase to 4
Completed Connect Scan at 00:52, 6.99s elapsed (1000 total ports)
Initiating Service scan at 00:52
Scanning 2 services on 192.168.1.101
Completed Service scan at 00:52, 7.00s elapsed (2 services on 1 host)
NSE: Script scanning 192.168.1.101.
NSE: Starting runlevel 1 (of 1) scan.
Nmap scan report for 192.168.1.101
Host is up (0.0026s latency).
Scanned at 2015-08-10 00:52:16 CEST for 14s
Not shown: 998 closed ports
PORT   STATE SERVICE VERSION
23/tcp open  telnet  BusyBox telnetd
80/tcp open  http    mini_httpd 1.19 19dec2003

Read data files from: /usr/local/bin/../share/nmap
Service detection performed. Please report any incorrect results at http://nmap.org/submit/ .
Nmap done: 1 IP address (1 host up) scanned in 14.24 seconds
There is telnet! Trying telnet 192.168.1.101 asks for a login and password, but at least it is not blocking connections! Not sure how that would work out remotely, but I suspect it would connect just fine.
Trying some of the worst passwords of 2014 it appears to actually be using the worst password in the world for root access: 123456.
MacBook-Air:~# telnet 192.168.1.101
Trying 192.168.1.101...
Connected to 192.168.1.101.
Escape character is '^]'.

(none) login: root
Password:

BusyBox v1.12.1 (2012-11-19 22:34:42 PST) built-in shell (ash)
Enter 'help' for a list of built-in commands.

#
Some firmware reversing adventures led me to check in the /mnt/5350 directory (I might write something about that another time):
# ls
var     tmp     sbin    mnt     lib     home    etc     bin
usr     sys     proc    media   init    etc_ro  dev
# cd mnt
# ls
pdbmountfs  5350        mtd         bin
test.sh     tmp         nfs
# cd 5350
# ls
mini_httpd.conf    modules            web                etc
user_info          usb_reset_logfile  lib
The user_info file looks interesting:
# cat user_info
admin:1357#
Well, looks like plaintext credentials for the web interface to me. Trying it and it works perfectly fine:

Final words
So that would be about it for this blogpost. Before I finish I do want to say that this research was done just for fun and no cameras were harmed in the process. Another thing is that I had access to the local network. I think that if you isolate these camera’s on a separate subnet and make sure they are not accessible from the outside (or only accessible from a fixed IP address with firewall rules in the router) you will be fine.
After this post is published I will send a link to ELRO to inform them about the security issues discussed here. If they release a firmware update to fix these issues I will update this post.
Till next time,
mrexodia
Extending De4dot
Hey, what’s up everybody?
About two months ago I came across a modified version of de4dot someone made, which required me to replace my current de4dot version in it’s entirety. I did not like this and therefore I decided to work on extension support for de4dot. Basically it allows you to add new deobfuscator modules or replace the existing (sometimes outdated) ones, in a dynamic way.
In this blogpost I will explain to you how to add a simple deobfuscator for OrangeHeap. The actual deobfuscator code is not written by me, but by TheProxy. It only serves as an example of how de4dot can be extended :)
Getting started
To get started, we need to set up our development environment. For this you need Git and Visual Studio. Follow these steps to get a development environment running:
- Clone the repository with
git clone --recursive https://github.com/0xd4d/de4dot.git; - Copy and rename the
deobfuscator.Templatedirectory todeobfuscator.OrangeHeap; - In that same directory, rename
deobfuscator.Template.csprojtodeobfuscator.OrangeHeap.csproj; - Open the main
de4dot.slnin Visual Studio 2010 or higher and adddeobfuscator.OrangeHeap.csprojto the solution; - Now the only thing left is to rename the output file name and namespace from
deobfuscator.Templatetodeobfuscator.OrangeHeap.
Coding the deobfuscator
In this post I won’t go too much in depth about the internal de4dot architecture, mainly because I don’t know a whole lot about it. You’d have to check the built-in deobfuscators by yourself to find out how it works. Here is a post by kao that explains extending de4dot in a more detailed manner.
The identifying class for a deobfuscator is the DeobfuscatorInfo class. It has to provide a Name and a Type string field, where the Type field must be unique. It also has a CreateDeobfuscator method that will handle the actual deobfuscation.
You can find the full code over here. TheProxy wrote a full tutorial with details over at his blog
Sharing the deobfuscator
Now before I go into this, I have to say that you are obligated by the license de4dot uses (GPL) to share any modifications you make to de4dot under the same (GPL) license. This includes extensions that are dynamically loaded by de4dot, although this is controversial.
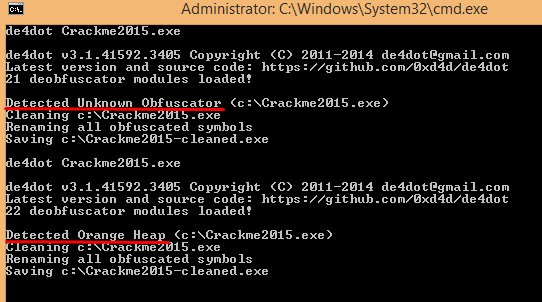
Now to share the deobfuscator, for example for internal company usage or simply because you want to share prebuilt binaries of your GPL extension, simply copy the bin/deobfuscator.OrangeHeap.dll to the de4dot bin directory on another machine. Here is a screenshot that shows what happens before and after I added the DLL to the bin directory (obviously without any other modifications to de4dot):
Overriding/Extending existing deobfuscators
If you want to change the behavior of an existing deobfuscator, simply make the DeobfuscatorInfo.Type field return an already-present typename (like co for CryptoDeobfuscator or df for Dotfuscator). Basically you have to rip the current deobfuscator class out in a separate project (I tested this). See here for a starting point. It should be pretty straightforward.
Well, that’s all for today. Hopefully till next time!
mrexodia